Home > PrestaShop 1.7 > Core Reference > Upgrade Module > Upgrade Process Steps
Table of Contents
Warning: You are browsing the documentation for PrestaShop 1.7, which is outdated.
You might want to look at the current version, PrestaShop 8. Read the updated version of the documentation
Upgrade process stems
All these steps are called from the entrypoint ajax-upgradetab.php.
Upgrade process schema
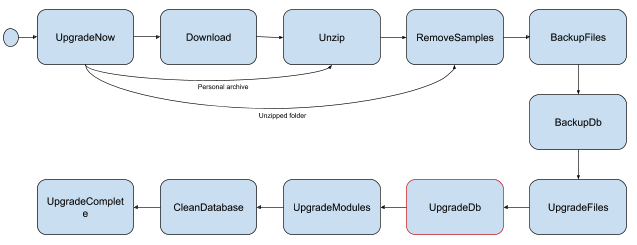
Upgrade
The following steps will be executed during the upgrade:
- UpgradeNow: Start of the whole process. The next step will be chosen depending on the configuration.
- Download: Download the proper archive depending on the selected channel
- Unzip: Unzip the downloaded archive
- RemoveSamples: The changes made by the merchant on his shop, like images, must not be deleted! This step removes the example files from the downloaded archive.
- BackupFiles: In case the upgrade does not went well, or if the merchant wants to rollback later, we save the files of the shop. Note this can be filtered, for example if a file is too big.
- BackupDb: Like the files, we save the current database structure and content, in case a rollback is needed.
- UpgradeFiles: Now the current content is saved, we can alter the shop content. This step will run several time. The first call will initialize the files list, then the next ones will copy a part of this list.
- UpgradeDb: This step does much more than you can think. Its initial purpose is to run all the upgrade SQL files available in the install folder. Then, it will run some additional steps, such as theme enabling, cache deletion, language update…
- UpgradeModules: With the list downloaded from the PrestaShop Marketplace in the first steps, we now request updated module zips and update the installed ones.
- CleanDatabase: This step run some SQL queries in order to remove obsolete or wrong data. Note the concerned data is not coming from the upgrade itself, but from the use of PrestaShop.
- UpgradeComplete: The upgrade completed and we want you to know it. This step will display a success message and will end the process.
Rollback
- Rollback: This is the entrypoint of the rollback process. It will find all the available backups regarding the given parameters (basically, the restore backup must be sent from the backup name you generated). If a backup matches the given parameters, the process starts the file restoration.
- NoRollbackFound: A classic task used to display a message saying no backup matches the given parameters, and terminates the process.
- RollbackFiles: Like the step UpgradeFiles, this step copies the files from the archive and remove the files absent from the original environment.
- RollbackDb: This task reads and runs the files generated by BackupDb.
- RollbackComplete: The upgrade may have failed or you were not completely satisfied by the new version, but we brought everything back. You can reuse the shop as before.
Other
These steps don’t follow any process and are independent between each others.
- CheckFilesVersion: This task is responsible to detect all local files has been modified by the merchant / developer. This is an important pre-requisite which warn about the potential loss of changes.
- Error: This task can be called from any other one, and will display a specific message saying the upgrade / restore process failed. In case of upgrade, a restore will be suggested.
- UpdateConfig: This task will store in a configuration file the different options selected in the web version of the module.