Warning: You are browsing the documentation for PrestaShop 1.7, which is outdated.
You might want to look at the current version, PrestaShop 8. Read the updated version of the documentation
Installing PrestaShop for development
Now that you intend to develop for PrestaShop, you are better off keeping all your development work on your machine. The main advantage is that it makes it possible for you to entirely bypass the process of uploading your file on your online server in order to test it. Another advantage is that a local test environment enables you to test code without the risk of breaking your production store. Have a local environment is the essential first step in the path of web development.
Prerequisites
Read System Requirements.
Installing a local environment
Installing any web-application locally requires that you first install the adequate environment, namely the Apache web server, the PHP language interpreter, the MySQL database server, and ideally a MySQL admin tool such as phpMyAdmin tool.
This is called an *AMP package: Apache+MySQL+PHP and the operating system, giving WAMP (Windows+Apache+MySQL+PHP), MAMP (Mac OS X+…) and LAMP (Linux+…). Since all of the items packaged are open-source, these installers are most of the time free.
Here is a selection of free AMP installers:
- XAMPP (Windows, Mac OS X, Linux, Solaris)
- WampServer (Windows)
- EasyPHP (Windows)
- MAMP (Windows, Mac OS X)
- Laragon (Windows)
To install LAMP on your computer follow these steps (tested on Debian Buster).
- Update your system
apt update - Install MySQL
apt install default-mysql-server default-mysql-client - Install Apache server
apt install apache2 - Install PHP
apt install libapache2-mod-php7.3 php7.3 php7.3-common php7.3-curl php7.3-gd php7.3-imagick php7.3-mbstring php7.3-mysql php7.3-json php7.3-xsl php7.3-intl php7.3-zip
Creating a database for your shop
If you are installing PrestaShop on a web server, then you must create the database and give access to a privileged user. You will need this user’s credentials to configure PrestaShop during the installation process.
Using phpMyAdmin
We assume you have root access to phpMyAdmin, and you’re using version 4.x.
- Sign in to
phpMyAdminas the root user - Click
User accounts, and then click onAdd user account - Fill the
User nameand thePassword - In the
Database for user account, selectCreate databaseandGrant all privileges - Create user and database and make sure the COLLATION of your database is
utf8mb4_general_ci
From the command line
The database must be created with 4-Byte UTF-8 encoding (utf8mb4_general_ci).
For information on installation and configuring MySQL see the MySQL 5.6 documentation.
Connect as root to your MySql server. In this example our root user is called adminusername:
$ mysql -u adminusername -p
Create the database and give it a name like “prestashop”:
> CREATE DATABASE prestashop COLLATE utf8mb4_general_ci;
Grant privileges to that database to a new user (the one that PrestaShop will use to connect to the database). Let’s call it “prestashopuser”.
> CREATE USER "prestashopuser"@"hostname" IDENTIFIED BY "somepassword";
> GRANT ALL PRIVILEGES ON prestashop.* TO "prestashopuser"@"hostname";
In the example above,
prestashopis the name of the new databasehostnameis usually localhost (127.0.0.1orlocalhost), if you don’t know the value, check with a system administratorsomepasswordmust be a strong password and of course, only known by you
Finally, flush privileges:
> FLUSH PRIVILEGES;
Downloading PrestaShop
The source code of PrestaShop is hosted on the Official PrestaShop GitHub Repository.
You can find all the released versions of PrestaShop here: PrestaShop releases.
Nightly releases of PrestaShop are also generated daily. Their details can be found on a public Google Cloud storage.
Choosing the right version for you
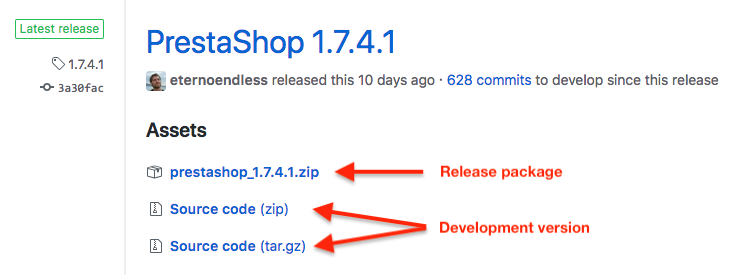
PrestaShop comes in two “flavors”:
- Release package. A zip package, tuned for production environments.
- Development version. The raw source code as it is on the GitHub repository, including automated test suites, build scripts and source codes for assets that are otherwise compiled (like javascript and css files).
Prefer cloning the repository using git for the development version.
If you intend to work on PrestaShop itself, we suggest using Git to clone the source code of PrestaShop from the GitHub repository.
Repository branches
As stated above, if you decide to work on PrestaShop itself, it’s best to clone the PrestaShop repository and work using git. Depending on the version of PrestaShop you want to work on, you will need to choose the right branch:
- The develop branch contains the current work in progress for the next minor or major version.
- This is the right branch to contribute new features, refactors, small bug fixes, etc.
- The maintenance branches (1.6.1.x, 1.7.0.x, 1.7.1.x, 1.7.2.x, …) contains all patches made for each minor version.
- For example, the 1.7.2.x branch contains all patches from 1.7.2.0 to 1.7.2.5.
- Whenever a new minor or major version is ready for release, a new maintenance branch is created. For example, 1.7.0.x for version 1.7.0.0, 1.7.1.x for 1.7.1.0, 1.7.2.x for 1.7.2.0, and so forth.
- Only the most recent maintenance branch accepts new contributions
Clone the repository using Git or extract the zip package in a prestashop folder inside the document folder of the AMP installer you chose:
- XAMPP:
C:\xampp\htdocsor/Applications/xampp/htdocs - WampServer:
C:\wamp\www - EasyPHP:
C:\easyphp\www - MAMP:
/Applications/MAMP/htdocs/
Download dependencies
PHP dependencies
Use composer to download the project’s dependencies:
cd /path/to/prestashop
composer install
# or alternatively, since 1.7.8:
make composer
JavaScript and CSS dependencies
PrestaShop uses NPM to manage dependencies and Webpack to compile them into static assets. You only need NodeJS 8.x (12.x maximum get it here), NPM will take care of it all.
cd /path/to/prestashop
make assets
Alternatively, you can compile assets manually.
Setting up file rights
PrestaShop needs recursive write permissions on several directories:
- ./admin-dev/autoupgrade
- ./app/config
- ./app/logs
- ./app/Resources/translations
- ./cache
- ./config
- ./download
- ./img
- ./log
- ./mails
- ./modules
- ./themes
- ./translations
- ./upload
- ./var
You can set up the appropriate permissions using this command:
$ chmod -R +w admin-dev/autoupgrade app/config app/logs app/Resources/translations cache config download img log mails modules themes translations upload var
If you do not have some of the folders above, please create them before changing permissions. For example:
$ mkdir log app/logs
To ease up your life on a development environment, we suggest to make Apache run with your own user and group.
Installing PrestaShop
Open the PrestaShop installer and follow its instructions.
Depending on whether you downloaded a release package or cloned the repository, the route to the installer will be slightly different:
- Release package: http://127.0.0.1/prestashop/install
- Development version: http://127.0.0.1/prestashop/install-dev
You can read the Getting Started guide for more details.
Troubleshooting
Compile Error: Cannot declare class AppKernel, because the name is already in use
You may find this error message the first time you open up the Back Office.
This problem may arise in case-insensitive file systems like MacOS due to a misconfiguration. Check your Apache configuration and make sure that the root directory path to your PrestaShop matches the capitalization of the actual system path exactly. A typical error is for example having a folder named /path/to/PrestaShop (capital P, capital S) and then configuring it in Apache as /path/to/Prestashop (missing the capital S).